
Welcome to MaxGood.Work's Coaching Platform #1 Feature Update & Enhancement Article.
What Did We Change On The “Content Upload” Feature?
Before the Update:
The ‘Content Upload’ feature in MaxGood’s platform supported users to upload multiple content files at a time. This process was meant to save-time especially for Avatar Owners with multiple files to configure their avatars effectively. However, there was no option to remove files mistakenly added during the upload process, leading to user experience hassle , errors in the title repository, and extra effort to correct them later using the “manage content” feature once the file has been uploaded.
After the Update:
With this latest update, the ‘Content Upload’ feature now allows users to:
- Maintain multiple files upload in one go—saving time and making the process more efficient.
- Review each files as they are been added—giving room to correct or validate files correctly added before clicking the “upload” button.
- Easily delete any added file before finalizing the upload—minimizing errors and ensuring the right content is added during the upload process for each title repository.
- Navigate through a more intuitive and user-friendly pop-up interface with clearly labeled options to upload or remove files.
This update streamlines the content upload process, enabling Avatar Owners to focus more on configuring their expertise and less on repetitive manual tasks.
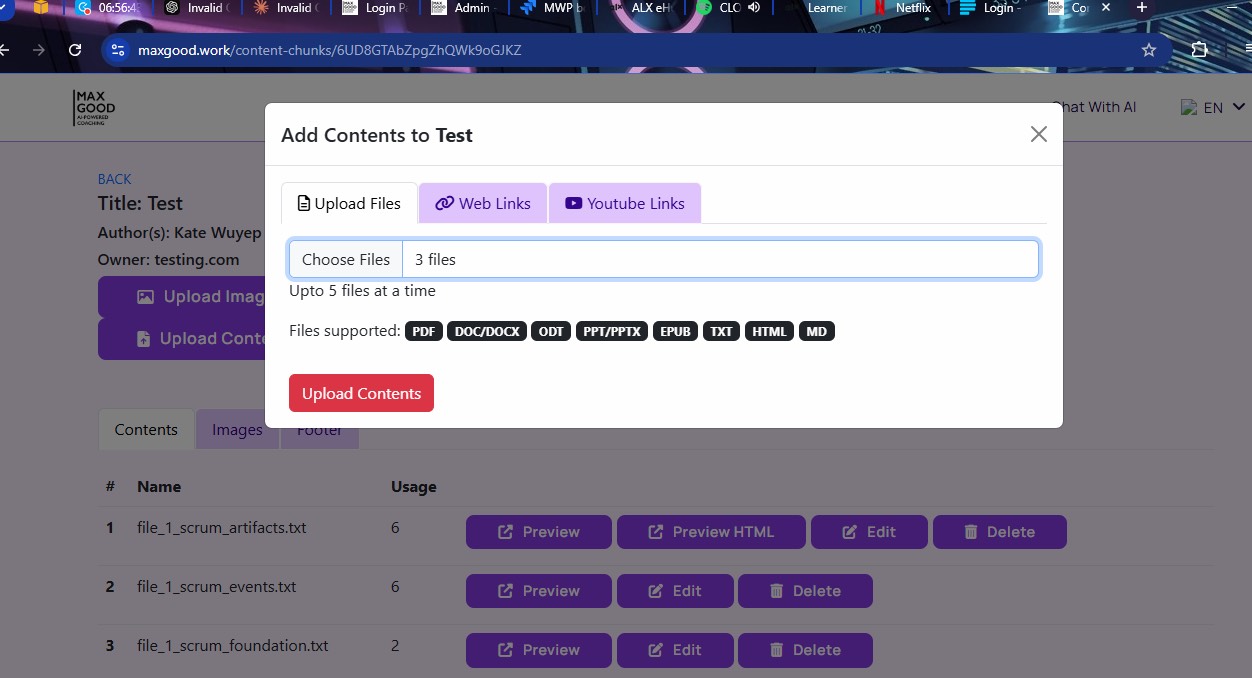
Content upload experience ‘BEFORE’ latest feature update release
VS
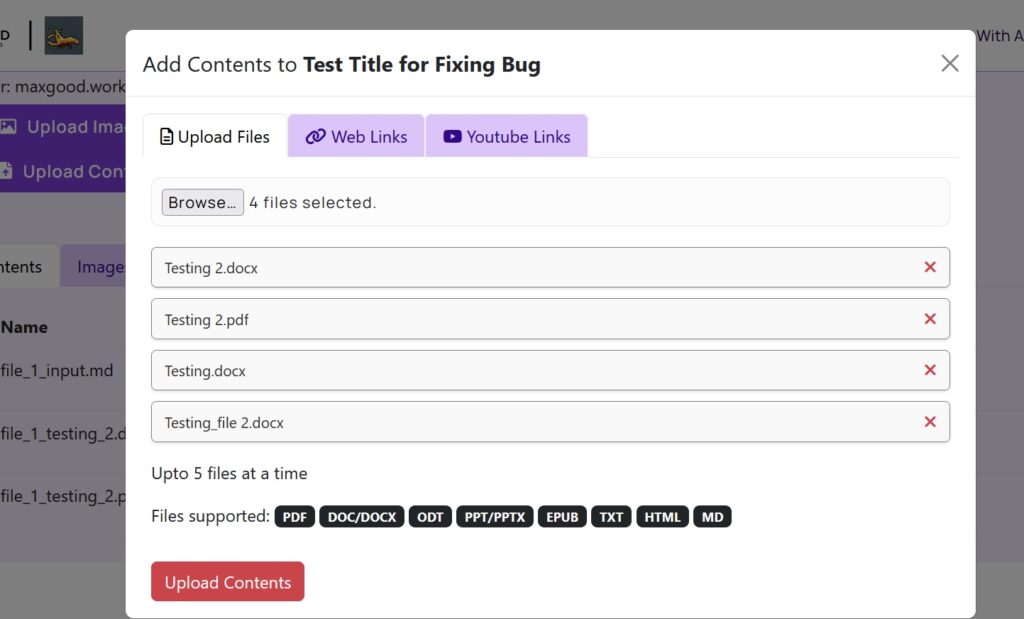
Content upload experience ‘AFTER’ latest feature update release
Benefits of the Improved “Content Upload” Feature
Improved Efficiency:
You can still upload multiple files at once, reducing the time spent on repetitive actions.
Error Prevention:
Now, you can easily delete incorrectly added files before they’re uploaded to your title repository, ensuring an accurate title-content repository.
Streamlined Onboarding:
Faster content upload completion improves onboarding speed for new users, allowing avatar owners to start coaching sooner.
Better User Experience:
Simplified, intuitive workflows make the platform more enjoyable and easier to use.
How The New “Content Upload Pop-Up Modal ” Feature Works
Step 1: Adding Multiple Files:
Select multiple files during the upload process. All selected files will appear in the pop-up modal for review.
Step 2: Deleting Files Before Upload into Title Repository:
Review the files listed in the modal. If any were added by mistake, click the new delete icon next to the file to remove it.
Step 3: Finalizing the Upload:
Once satisfied with the added files, click the “Upload” button to add them to your title repository.
This streamlined workflow is designed for simplicity, reducing friction and helping you maintain a clean, accurate content library.
Before and After Comparison
Before UX Improvement:
Users can add and upload multiple files at once.
It’s hard to ensure you are adding the files you expect.
- No option to delete erroneous files during the upload process leading to additional effort to delete files in the title repository after successfully uploaded.
After UX Improvement:
Users can still add and upload multiple files in one instance.
There is now a delete icon to allow for on-the-spot removal of incorrect added files before clicking “upload’ button.
- Users can see list of files added before doing the upload leading to a faster, more seamless experience for avatar owners.
Troubleshooting & Starter Guide
Troubleshooting Tips
Issue: While uploading content, I accidentally added the wrong file and couldn’t delete it.
Solution: Ensure you’re reviewing the files added while using the ‘upload content’ pop-up modal. Use the delete icon to remove any incorrect files before clicking the “Upload” button for final upload.Issue: The modal doesn’t display all the files I selected for upload.
Solution: Double-check that the files meet the upload size and format requirements. Unsupported files won’t appear in the added files list.Issue: Uploading multiple files takes too long.
Solution: Ensure a stable internet connection and avoid uploading excessively large files at the same time.
Starter Guide
- As an avatar owner or admin, navigate to the ‘Expertise’ tab in your MaxGood admin dashboard.
- Locate the ‘Add title’ feature, add your desired title and select the “Upload Content’ button.
- Click “Upload files” to add files for your content upload once the content upload modal shows up.
- Select up to 5 files from your local computer or device to include in a single upload instance.
- Review the added files in the modal: Use the delete icon to remove any erroneously added file.
- Once satisfied, click “Upload content” to finalize the process.
- Your content is now successfully uploaded and ready for use in the title repository and in your client interaction with your avatar.
Ready to Experience the New and Improved Content Upload Feature?
We’re thrilled to bring you this update to enhance your experience as an avatar owner on MaxGood. With smoother uploads, error-proof content configuration, and faster task completion, managing your avatar’s expertise has never been easier.
Try it out today and upload your expertise seamlessly! Sign-up or Log in to your MaxGood dashboard and start building the foundation for an even more personalized and impactful coaching experience.
Have feedback or questions? We’d love to hear from you! Contacts us at support@maxgood.work or share your experience with the new feature in our WhatsApp user community group.